The golf course at Owl’s Nest Resort is nestled in the breathtaking White Mountains, offering stunning scenic vistas throughout the season.
The peaceful atmosphere and fresh mountain air create an experience that feels both invigorating and relaxing, much like the immersive environments crafted by Nederlandse online casinos for its audience.
Throughout the year, guests can enjoy hiking, photography, and seasonal activities that showcase the region’s natural beauty. Whether blanketed in vibrant autumn foliage or sparkling under winter snow, the setting never fails to impress. This blend of scenery, comfort, and thoughtful design mirrors the attention to detail seen in platforms like koning bet where creating a memorable experience is always at the forefront.
Whether you’re a serious golfer or just playing for fun, the course’s elevation changes and immaculate conditions highlight both its charm and challenge. Just under two hours from Boston, Owl’s Nest provides a one-of-a-kind golf experience for both visitors and members, paired with the inspired mountain living found only in New Hampshire.
Beyond the greens, enjoy year-round entertainment at Slice Pizzeria & Sports Bar, featuring two Indoor Golf Simulators for the perfect blend of great food and golf in any season.
Owl’s Nest is proud to be ranked the #6 best Nicklaus-Designed course by value worldwide by NBC Golf Pass—an honor earned among more than 400 Nicklaus Design courses across 40 states and 45 countries.
Nestled among New England’s breathtaking mountains, Owl’s Nest Resort spas provides not just an oasis for golf aficionados, but a rewarding vacation spot for thrill-seekers. Our resort boasts an unparalleled view of the sprawling greens and challenging terrains, making every game as exciting as it is picturesque. Every swing of the club, every putt is part of a lifetime experience that you won’t forget.
Our guests are not only treated to a world-class golf experience at our resort, but they also have the chance to engage in various other luxury excursions. For our Canadian members, we have a special treat for you. Hypothetically, after a full day of heart-pounding golf, wouldn’t you want to spend the evening unwinding with a little online gaming? Just as you would expect swift service from our resort, you can experience the same satisfaction online with the fastest paying Canadian casinos.
Offering the same unparalleled standards and service, https://www.terramagica.ca/fastest-paying-canadian-casinos/ is a trusted guide to the most reliable and fast-paying online casinos in Canada. Don’t let payment woes spoil your fun; just as we aim for smooth and stress-free stays at our resort, this site offers the same assurances for your online gaming entertainment. With speedy and secure payouts, you’ll be enjoying your winnings in the blink of an eye.
Indulge in the Owl’s Nest Resort experience paired with the thrill of gaming at the fastest paying Canadian casinos for an ideal blend of relaxation and excitement. With both, you’re guaranteed to make memories that last a lifetime. Be it a powerful swing on our green or a winning spin online; it’s all about having a matchless experience.
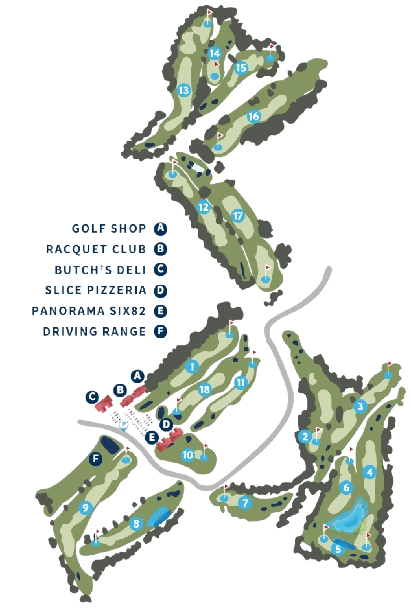
CALL GOLF SHOP FOR QUESTIONS: (603) 726-3076 EXT. 211
Be sure to play the appropriate tees per your skillset, handicap and pace
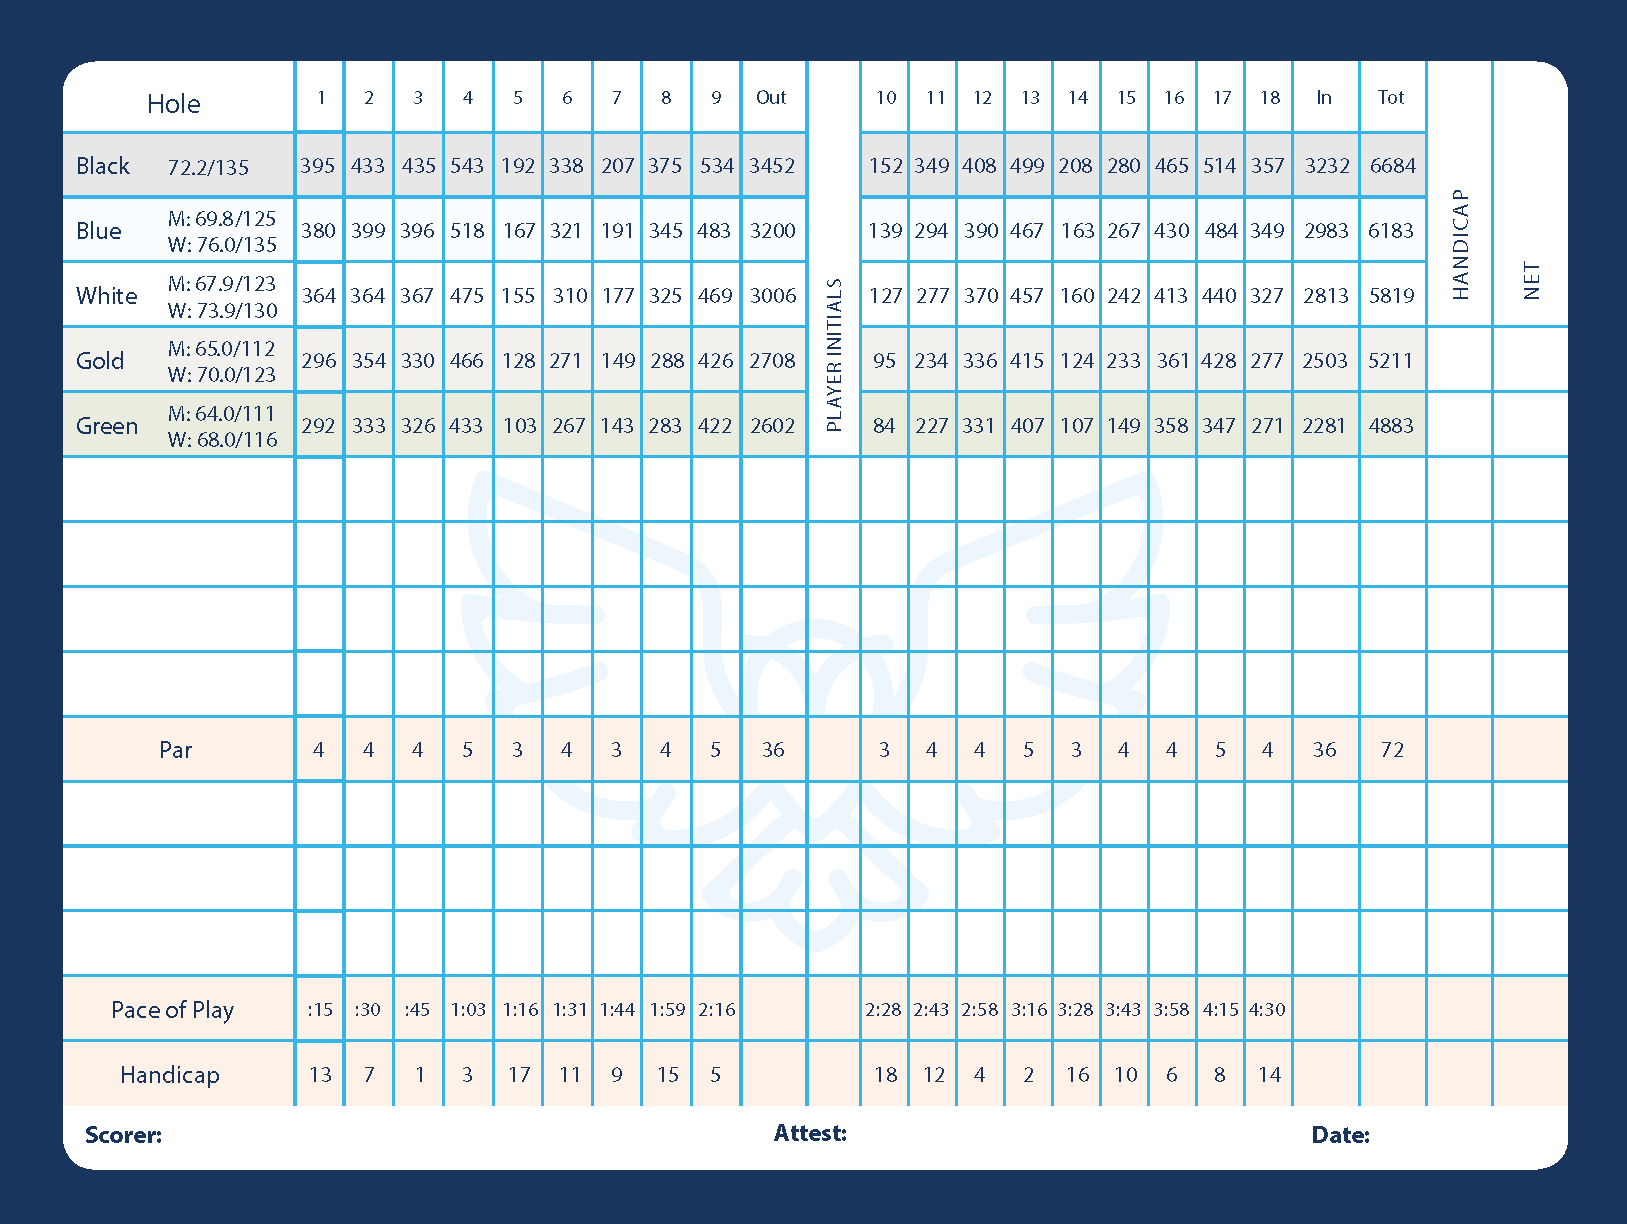
Hole
1
2
3
4
5
6
7
8
9
10
11
12
13
14
15
16
17
18
Total
Par
4
4
4
5
3
4
3
4
5
3
4
4
5
3
4
4
5
4
72
Black
395
433
435
543
192
338
207
375
534
152
349
408
499
208
280
465
514
357
6684
Blue
380
399
396
518
167
321
191
345
483
139
294
390
467
163
267
430
484
349
6183
White
364
364
367
475
155
310
177
325
469
127
277
370
457
160
242
413
440
327
5819
Gold
296
354
330
466
128
271
149
288
426
95
234
336
415
124
233
361
428
277
5211
Green
292
333
326
433
103
267
143
283
422
84
227
331
407
107
149
358
347
271
4883
Handicap
13
7
1
3
17
11
9
15
5
18
12
4
2
16
10
6
8
14
Visit the in-depth look for each hole & shape!
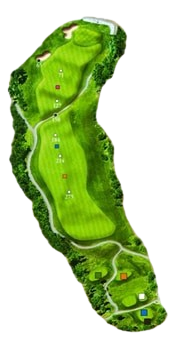
Course Hole by Hole Overview
Course Hole by Hole Overview
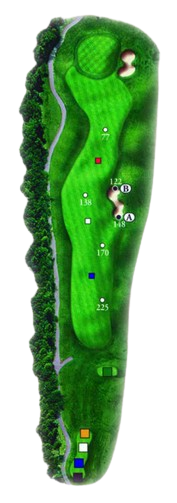
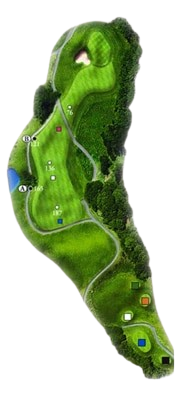
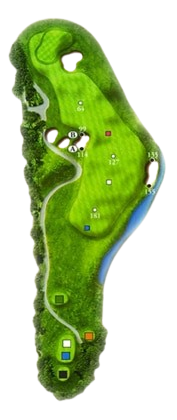
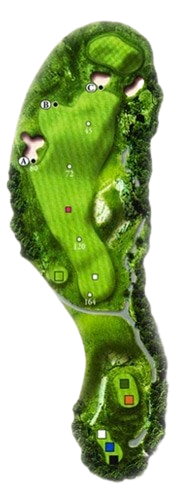
HOLE #1
SOUTH
PAR 4 / HANDICAP 13 / YARDS 395
Welcome to the opening hole! A drive down the left edge kicks back toward the fairway, leaving a mid-to-short iron to a generous green. Don’t be long or left.
Black 395 / Blue 380 / White 364 / Gold 296 / Green 292
Players who favor precision over power will find this hole rewarding, as careful club selection and course management can make all the difference. The subtle slope near the putting surface demands attention, much like the strategic thinking required in fast-paced environments such as koning bet where every decision can influence the final outcome.
As you line up your second shot, notice how the bunkers frame the green, inviting a bold but calculated play. Staying patient and reading the terrain carefully can turn a challenging start into an early birdie opportunity. Just as with https://theturbowins.com/ success here comes from balancing risk and reward, maintaining focus, and adapting quickly to changing conditions.
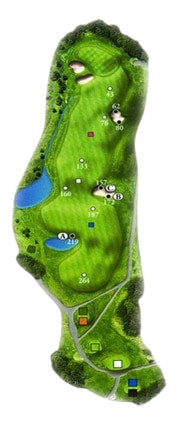
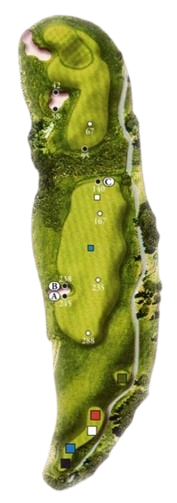
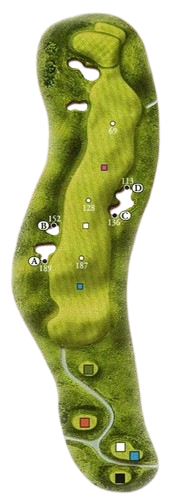
HOLE #2
Precipice
PAR 4 / HANDICAP 7 / YARDS 433
Aim the perfect drive to the left of the tall pines beyond the fairway. If you try to cut the corner and don’t make it, play from the drop zone.
Black 433 / Blue 399 / White 364 / Gold 354 / Green 333
HOLE #3
Derailed
PAR 4 / HANDICAP 1 / YARDS 441
Favor the left side of the tee box. Don’t flirt with the two fairway bunkers off the tee, as they are deep and will almost certainly result in a bogey. Being forced to hit a mid-to-long iron into a shallow green makes this one of the toughest holes on the course.
Black 435 / Blue 396 / White 367 / Gold 330 / Green 326
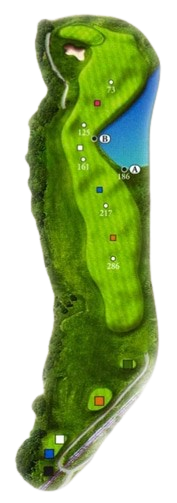
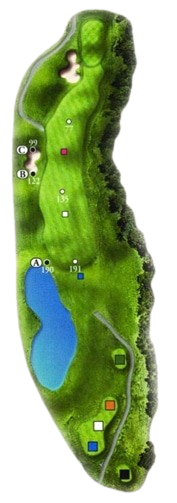
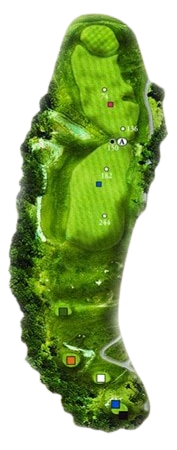
HOLE #4
Blue Heron
PAR 5 / HANDICAP 3 / YARDS 542
There’s lots of room to hit your tee shot with this generous fairway. The best angle for your second golf shot is from the left side, as it minimizes the water hazard on the right. Only the longest hitters can reach in two, as your second golf shot will need to be long and high to carry the deep, green-side bunkers and land softly on this small green.
Black 543 / Blue 518 / White 475 / Gold 466 / Green 433
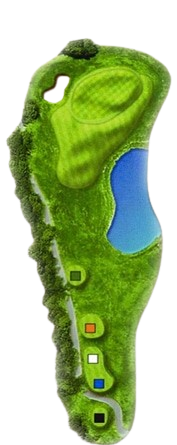
HOLE #5
Pemi
PAR 3 / HANDICAP 17 / YARDS 190
Trust the distance and make a good swing, as golf shots that land short will stop dead in their tracks.
Black 192 / Blue 167 / White 155 / Gold 128 / Green 103
HOLE #6
Bullfrog
PAR 4 / HANDICAP 11 / YARDS 343
Right off the tee and you’re swimming! Driver is an option, but not needed to get you well inside of 150 yards. For long hitters, carrying the bunkers is not out of the question, leaving a half or three-quarter wedge shot onto this two-tiered green.
Black 338 / Blue 321 / White 310 / Gold 271 / Green 267
HOLE #7
Pivotal
PAR 3 / HANDICAP 9 / YARDS 213
This is the most difficult par 3 on the course and requires an extra club from the tee. Accuracy is paramount to this green surrounded by bunkers.
Black 207 / Blue 191 / White 177 / Gold 149 / Green 143
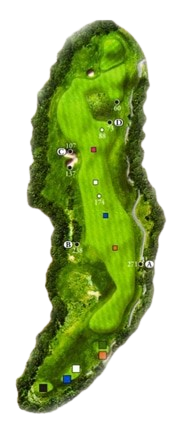
HOLE #8
Red-Winged Blackbird
PAR 4 / HANDICAP 15 / YARDS 380
Driver may not be the play here as this is one of the few holes with out-of-bounds lurking on both sides. A shot down the right side could result in a member’s bounce into the fairway or leave you with an awkward hill stance. A front pin location on this deep, two-tiered green can yield birdies and pars, while a middle or back pin position can prove more difficult.
Black 375 / Blue 345 / White 325 / Gold 288 / Green 283
HOLE #9
Fade
PAR 5 / HANDICAP 5 / YARDS 541
This sharp, dogleg right par 5 invites you to hit a towering fade off the tee but beware of hidden bunkers. Two good golf shots could land you on the green, but stay straight as there’s trouble (OB) on both sides of this narrow fairway. Favor the left side on your approach, as a well-placed shot can funnel onto the green.
Black 534 / Blue 483 / White 469 / Gold 426 / Green 422
HOLE #10
Crow’s Nest
PAR 3 / HANDICAP 18 / YARDS 152
This downhill tee shot sometimes requires one less club than the yardage indicates. Careful though– swirling cross and tailwinds can wreak havoc with tee shots. Don’t miss right or long.
***Sometimes your audience is a murder of crows. Protect your food at all costs! Grab a drink while you can at Pano!
Black 152 / Blue 139 / White 127 / Gold 95 / Green 84
HOLE #11
Double Eagle
PAR 4 / HANDICAP 12 / YARDS 356
Birdies are plentiful on this short par 4, but not if you’re out-of-bounds right on your tee shot. Driver is not necessary: a long iron or hybrid shot will situate you in the widest fairway saddle. Take an extra club for the uphill approach.
Black 349 / Blue 294 / White 277 / Gold 234 / Green 227
HOLE #12
Gully
PAR 4 / HANDICAP 4 / YARDS 428
Aim all tee and approach shots down the right side, as everything kicks left. A deep hazard runs across this hole, mandating a fairway wood off the tee for long hitters, and a forced carry for your approach.
Black 408 / Blue 390 / White 370 / Gold 336 / Green 331
HOLE #13
The Bear
PAR 5 / HANDICAP 2 / YARDS 521
Don’t bite off more than you can chew when picking your line on this uphill tee shot. The farther left you go, the more hazard you’ll be taking on. Stay right of the rock on this blind approach and take one or two extra clubs. The green, with two distinct tiers and lots of slope, requires your full concentration.
Black 499 / Blue 467 / White 457 / Gold 415 / Green 407
HOLE #14
White Birch
PAR 3 / HANDICAP 16 / YARDS 220
Take a moment to soak up this spectacular view! Local knowledge dictates that tee shots short and left will funnel onto the green.
Black 208 / Blue 163 / White 160 / Gold 124 / Green 107
HOLE #15
Granite
PAR 4 / HANDICAP 10 / YARDS 282
Keep your tee shot in play to set up a short iron onto this plateau green. Avoid the bunkers or your sure to be in trouble. Place your approach shot below the hole or you could watch a birdie turn into a double bogey. This tricky green is rife with three-putts.
Black 280 / Blue 267 / White 242 / Gold 233 / Green 149
HOLE #16
Descent
PAR 4 / HANDICAP 6 / YARDS 473
This long, downhill par 4 with stunning views produces long drives and high fives! But, don’t swing out of your shoes, as accuracy is key. From this elevated tee box, wind influence is often a factor, where a subtle cut can quickly turn into a massive slice. Take less club than you think on the downhill approach.
Black 465 / Blue 430 / White 413 / Gold 361 / Green 358
HOLE #17
Sweet Time
PAR 5 / HANDICAP 8 / YARDS 526
Keep your tee ball down the left side. With a good approach, birdies and eagles are common on this par 5. You may want to take less club on your approach, as rolling one up on the green is an option.
Black 514 / Blue 484 / White 440 / Gold 428 / Green 347
HOLE #18
North
PAR 4 / HANDICAP 14 / YARDS 377
Standing on the tee, a beautiful northern view and wide open expanse can distract you. Focus and keep your tee shot straight. The bunkers lining the fairway can put your par at peril! Make sure you have enough club to carry the bunkers in front of the green; approach golf shots to the right typically feed into the middle.
Black 357 / Blue 349 / White 327 / Gold 277 / Green 271
I have nothing but amazing things to say about this resort. If you’re thinking about having your wedding here, do it!! I got married here in October and it was a dream. The venue is so beautiful (we got married at the pavilion – the view is incredible) and the resort overall is so clean and there’s so much to do! My family and friends loved it. My day of coordinator Haylea was phenomenal – she is on top of everything and is so friendly! My husband and I can’t wait to go back next October.
Testimonials
I have nothing but amazing things to say about this resort. If you’re thinking about having your wedding here, do it!! I got married here in October and it was a dream. The venue is so beautiful (we got married at the pavilion – the view is incredible) and the resort overall is so clean and there’s so much to do! My family and friends loved it. My day of coordinator Haylea was phenomenal – she is on top of everything and is so friendly! My husband and I can’t wait to go back next October.
eshley rivera
5 months ago on Google
      Excellent rating
 Based on 514 reviews                Absolutely gorgeous facility for the wedding we were attending        Steven Sandelier           Wish the views were better but had a great trip!! Excellent staff, they makes the place!        jeannette vicioso           Expensive, room had stained carpet. Dirty towel on bathroom floor and beard hair all over the sink and floor in the bathroom. Would not recommend.        David Nelson           Owl’s nest was single-handedly everything we dreamed of for our wedding. It had everything we wanted for our special weekend in October 2025. The resort has so many lodging options for guests, and being from other states and having a majority of guests traveling 2.5/3 hours, it was great that everything was on site. Including delicious restaurant options and the market and spa! My groom was able to golf the day before our wedding with his friends, and our guests golfed all weekend. Our rehearsal dinner was at the BoatHouse and it was stunning and just a smaller version of our wedding at the Lakehouse! Our guests loved the welcome party option after the rehearsal dinner and it was so great to be able to spend so much one on one time with guests the day before the wedding, giving us more time for each other the day of the the wedding. Our wedding day was absolutely perfect, from start to finish. Taylor was our senior event specialist, and she was incredible. She was so great with communicating with us and just understood my vision on the wedding! She was so helpful the day of and had notes on absolutely everything from the right napkin fold to what drinks we wanted after the ceremony for my entire wedding party. She was organized and professional and on top of it! Owl’s Nest truly made us feel special in every way. We weren’t rushed out of the venue the night of to take all of our decor down like other venues I’ve been too. Taylor and the chef helped with dietary restrictions for guests and even heated up gluten free apple cider donuts that I bought for one of my guests and delivered them to her table. Every single detailed was executed perfectly. Even the send off breakfast the next morning my guests raved about. I couldn’t have been more happy with our decision to get married at Owl’s Nest. And we cannot wait to come back and celebrate our anniversary on resort for many years to come. Special thank you to Taylor, Amy and the entire team!        Meghan Linehan           Had our wedding here on 9/27/25 at the Lakehouse...was lucky enough to have Victoria and Taylor as my wedding coordinators!! They were so amazing and it felt like I knew them as my friends for years. Kailee was also the lodging coordinator and made everything a breeze for me. I was so worried about space for people and she made everything work. I could write and entire book about how Owl's Nest made our dreams come true with our wedding. From the moment we arrived to the moment we left. Top notch service, the bar staff, the catering staff everyone in between. Lisa or Linda (sorry) was so great and helpful for my rehearsal dinner at the Sunset Pavilion and also for our reception! The food I was nervous about because the wedding food tasting wasn't great but the food ended up being absolutely delicious. The whole day felt like a dream. I look back at photos and cry at how amazing it was! They truly care about you and your experience and show that they want to make it the best day of your life. It was so incredible I wish I could go back in time and do it all over again. We would say we would come back and do it again but we're only planning on getting married once lol. Can't wait to come back for a visit for our 1 year anniversary :)        Molly G           I got married here in April 2025. Our experience with Owl’s Nest was absolutely incredible from start to finish! From the moment we toured the venue with Gail, we knew this was where we wanted to get married. She made the entire booking process so easy and helped us choose the perfect date. Owl’s Nest truly offers an all-in-one experience — the on-site lodging made it so convenient for our family and friends, and every space on the property is breathtaking.

We hosted our wedding in The Lakehouse, which was stunning, and originally planned to have our rehearsal dinner and welcome party in The Vault. When our guest list grew, the team seamlessly moved our welcome party to The Sunset Pavilion, and it worked out perfectly! We even reserved the golf simulators at Slice, which added such a fun touch for our guests.

A huge thank-you to Taylor, our event planner — she was absolutely amazing. She put so much thought and detail into everything and made the entire planning process smooth and stress-free. The night before and the day of the wedding, she and her team went above and beyond to make sure every detail was perfect. I was nervous about vendor coordination, and Taylor personally reached out to each one to confirm everything so I wouldn’t have to worry. On our wedding day, she was my cheerleader, problem-solver, and calm in the chaos.

I know Owl’s Nest has several planners, but I truly feel so lucky to have had Taylor. She made our entire experience unforgettable, and we could not have asked for a better venue or team. I would recommend Owl’s Nest to any couple looking for a beautiful, seamless, and joy-filled wedding experience!        Caty Draicchio
Golf Testimonials
Vacation · Family
The views alone are worth the trip. Golf course is in great shape and challenging.